Creating a New FTP Site in IIS 7
Compatibility
| Version | Notes |
|---|---|
| IIS 7.5 | The FTP 7.5 service ships as a feature for IIS 7.5 in Windows 7 and Windows Server 2008 R2. |
| IIS 7.0 | The FTP 7.0 and FTP 7.5 services were shipped out-of-band for IIS 7.0, which required downloading and installing the service from the following URL: http://www.iis.net/download/FTP. |
Introduction
Microsoft has updated the FTP service for Windows Server® 2008 and above. This updated FTP service incorporates many new features that enable Web authors to publish content better than before, and offers Web administrators more security and deployment options.This document walks you through creating FTP sites from scratch using the new FTP user interface and by directly editing the IIS configuration files. It contains:
- Creating a New FTP Site Using the IIS Manager
- Creating a New FTP Site by Editing the IIS Configuration Files
Prerequisites
The following items are required to complete the procedures in this article:- IIS must be installed on your Windows 2008 Server, and the Internet Information Services Manager must be installed.
- The new FTP service must be installed. You can download and install the FTP service from the http://www.iis.net/ Web site using one of the following links:
- You must create a root folder for FTP publishing.
Creating a New FTP Site Using IIS Manager
The new FTP service makes it easy to create new FTP sites by providing you with a wizard that walks you through all of the required steps to create a new FTP site from scratch.Step 1: Use the FTP Site Wizard to Create an FTP Site
In this first step you will create a new FTP site that anonymous users can open.Note: The settings listed in this walkthrough specify "%SYSTEMDRIVE%\inetpub\ftproot" as the path to your FTP site. You are not required to use this path; however, if you change the location for your site you will have to change the site-related paths that are used throughout this walkthrough.
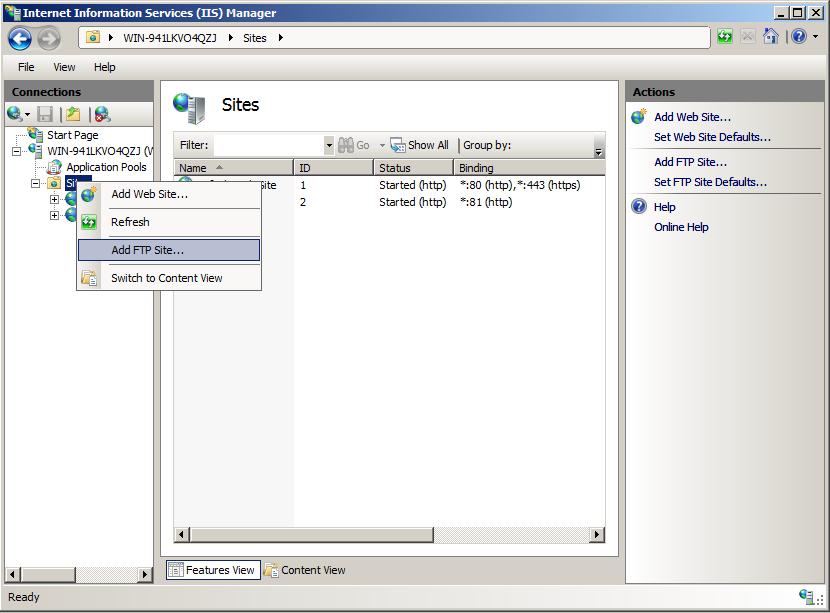
- Open IIS Manager. In the Connections pane, click the Sites node in the tree.
- As shown in the image below, right-click the Sites node in the tree and click Add FTP Site, or click Add FTP Site in the Actions pane.
- Create a folder at "%SystemDrive%\inetpub\ftproot"
- Set the permissions to allow anonymous access:
- Open a command prompt.
- Type the following command:
ICACLS "%SystemDrive%\inetpub\ftproot" /Grant IUSR:R /T - Close the command prompt.
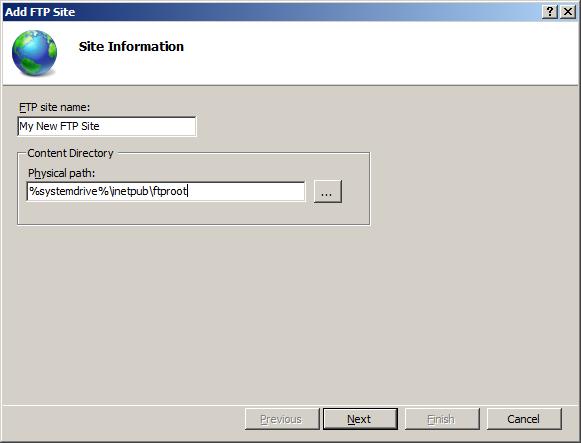
- When the Add FTP Site wizard appears:
- Enter "My New FTP Site" in the FTP site name box, then navigate to the %SystemDrive%\inetpub\ftproot folder that you created in the Prerequisites section. Note that if you choose to type in the path to your content folder, you can use environment variables in your paths.
- When you have completed these items, click Next.
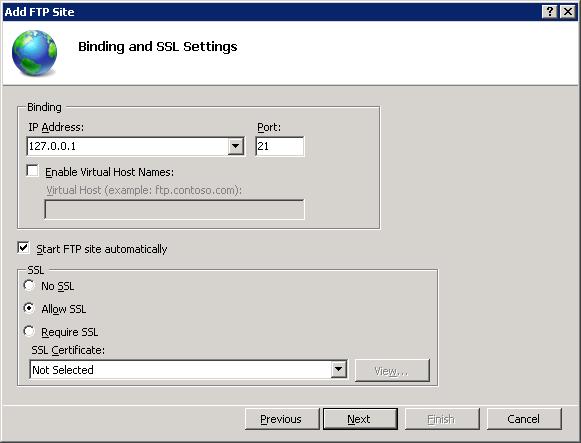
- On the next page of the wizard:
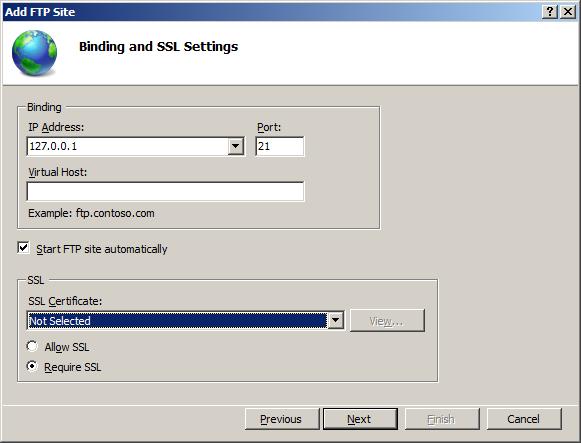
- Choose an IP address for your FTP site from the IP Address drop-down, or choose to accept the default selection of "All Unassigned." Because you will be using the administrator account later in this walk-through, you must ensure that you restrict access to the server and enter the local loopback IP address for your computer by typing "127.0.0.1" in the IP Address box. (Note: If you are using IPv6, you should also add the IPv6 localhost binding of "::1".)
- Enter the TCP/IP port for the FTP site in the Port box. For this walk-through, choose to accept the default port of 21.
- For this walk- through, do not use a host name, so make sure that the Virtual Host box is blank.
- Make sure that the Certificates drop-down is set to "Not Selected" and that the Allow SSL option is selected.
- When you have completed these items, click Next.
- On the next page of the wizard:
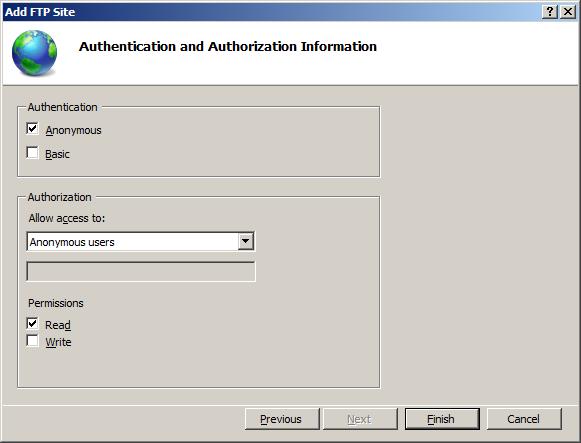
- Select Anonymous for the Authentication settings.
- For the Authorization settings, choose "Anonymous users" from the Allow access to drop-down, and select Read for the Permissions option.
- When you have completed these items, click Finish.
Summary
You have successfully created a new FTP site using the new FTP service. To recap the items that you completed in this step:- You created a new FTP site named "My New FTP Site", with the site's content root at "%SystemDrive%\inetpub\ftproot".
- You bound the FTP site to the local loopback address for your computer on port 21, and you chose not to use Secure Sockets Layer (SSL) for the FTP site.
- You created a default rule for the FTP site to allow anonymous users "Read" access to the files.
Step 2: Adding Additional FTP Security Settings
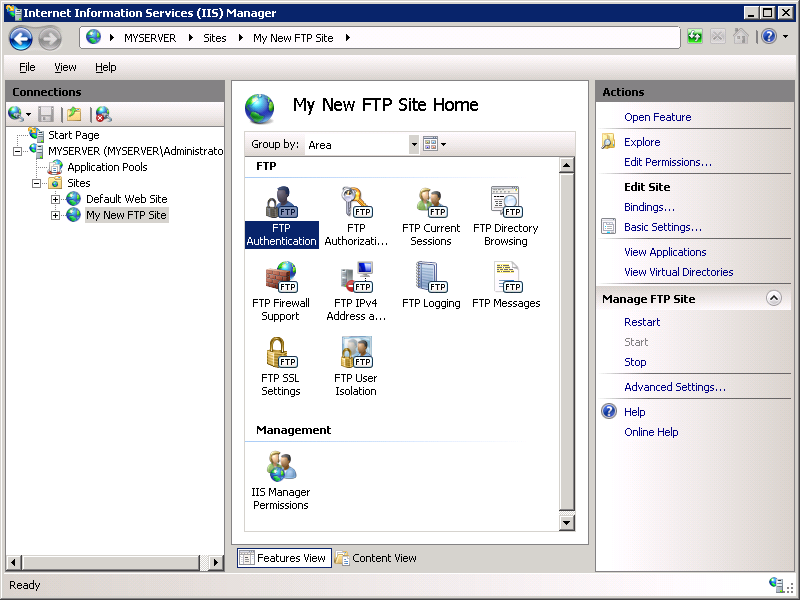
Creating a new FTP site that anonymous users can browse is useful for public download sites, but web authoring is equally important. In this step, you add additional authentication and authorization settings for the administrator account. To do so, follow these steps:- In IIS Manager, click the node for the FTP site that you created earlier, then double-click FTP Authentication to open the FTP authentication feature page.
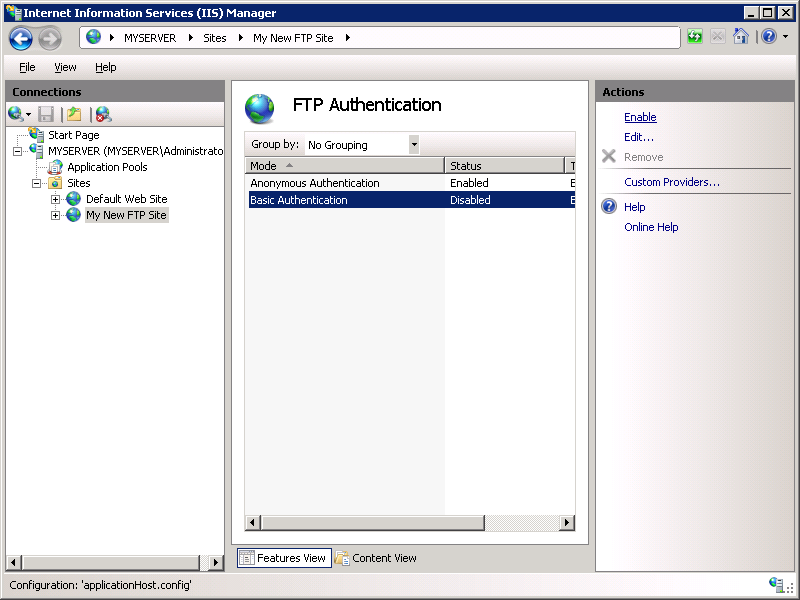
- When the FTP Authentication page displays, highlight Basic Authentication and then click Enable in the Actions pane.
- In IIS Manager, click the node for the FTP site to re-display the icons for all of the FTP features.
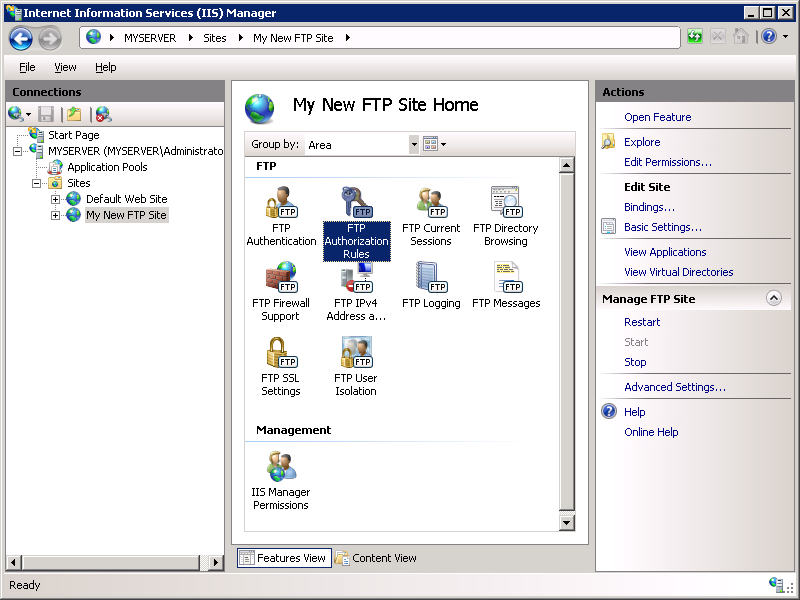
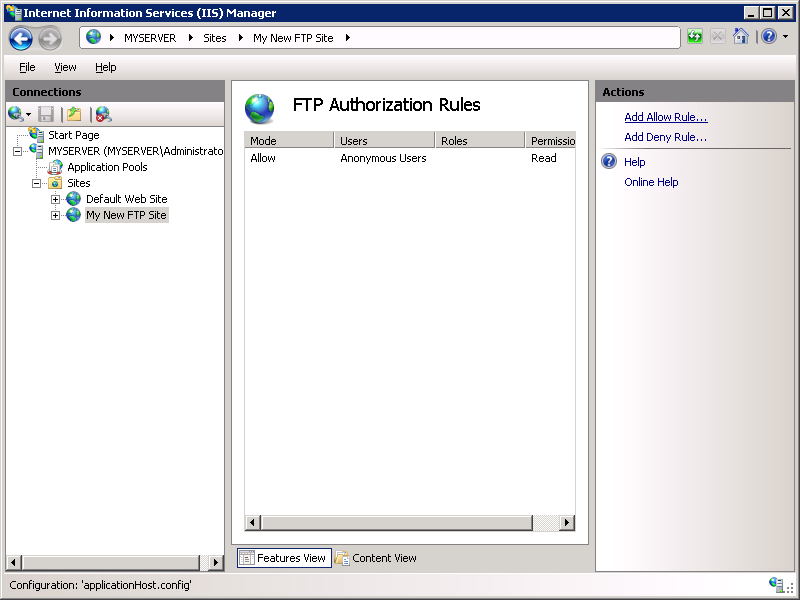
- You must add an authorization rule so that the administrator can log in. To do so, double-click the FTP Authorization Rules icon to open the FTP authorization rules feature page.
- When the FTP Authorization Rules page is displayed, click Add Allow Rule in the Actions pane.
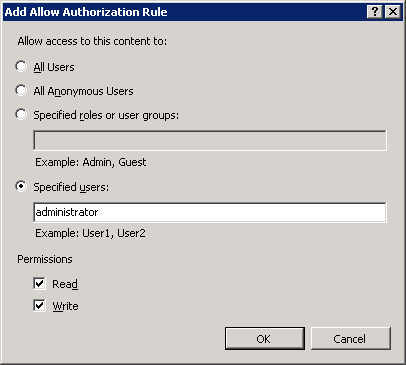
- When the Add Allow Authorization Rule dialog box displays:
- Select Specified users, then type "administrator" in the box.
- For Permissions, select both Read and Write.
- When you have completed these items, click OK.
Summary
To recap the items that you completed in this step:- You added Basic authentication to the FTP site.
- You added an authorization rule that allows the administrator account both "Read" and "Write" permissions for the FTP site.
Step 3: Logging in to Your FTP Site
In Step 1, you created an FTP site that anonymous users can access, and in Step 2 you added additional security settings that allow an administrator to log in. In this step, you log in anonymously using your administrator account.Note: In this step log in to your FTP site using the local administrator account. When creating the FTP site in Step 1 you bound the FTP site to the local loopback IP address. If you did not use the local loopback address, use SSL to protect your account settings. If you prefer to use a separate user account instead of the administrator account, set the correct permissions for that user account for the appropriate folders.
Logging in to your FTP site anonymously
- On your FTP server, open a command prompt session.
- Type the following command to connect to your FTP server:
FTP localhost
- When prompted for a user name, enter "anonymous".
- When prompted for a password, enter your email address.
Logging in to your FTP site using your administrator account
- On your FTP server, open a command prompt session.
- Type the following command to connect to your FTP server:
FTP localhost
- When prompted for a user name, enter "administrator".
- When prompted for a password, enter your administrator password.
Summary
To recap the items that you completed in this step:- You logged in to your FTP site anonymously.
- You logged in to your FTP site as the local administrator.
Creating a New FTP Site by Editing the IIS Configuration Files
You can also create FTP sites for the new FTP service by editing the IIS configuration files.Note: Editing your ApplicationHost.config file requires full administrative permissions. This is best accomplished using one of two methods:
- Log in to your computer using the local "administrator" account.
- If you are logged in using an account with administrative permissions that is not the local "administrator" account, open Notepad using the "Run as Administrator" option.
http://go.microsoft.com/fwlink/?LinkID=113664
The following steps walk you through all of the required settings to create a new FTP site from scratch.
- Using a text editor such as Windows Notepad, open your ApplicationHost.config file, which is located in your %SystemRoot%\System32\inetsrv\config folder by default.
- Locate the <sites> section. This section contains your Default
Web Site and should begin with something like the following:
<sites>
<site name="Default Web Site" id="1">
<application path="/">
<virtualDirectory path="/" physicalPath="%SystemDrive%\inetpub\wwwroot" />
</application>
<bindings>
<binding protocol="http" bindingInformation="*:80:" />
</bindings>
</site> - Copy the entire section for the Default Web Site and paste it on a new line just below the closing </site> tag.
- Change the site's settings to create a unique FTP site:
- Modify the name and id attributes for the new site to respectively contain "Default FTP Site" and "2".
Note: You may need to choose a different number than "2" for the site ID if any site is currently using that site identifier. - Change the value of the protocol attribute on the binding element to contain "ftp".
- Change the physicalPath attribute to "%SystemDrive%\inetpub\ftproot".
- Change the port value of the bindingInformation attribute to contain "21".
- Modify the name and id attributes for the new site to respectively contain "Default FTP Site" and "2".
- Add an <ftpServer> section beneath the closing bindings tag that will contain your authentication settings.
<ftpServer>
<security>
<authentication>
<anonymousAuthentication enabled="true" userName="IUSR" />
<basicAuthentication enabled="true" />
</authentication>
<ssl controlChannelPolicy="SslAllow" dataChannelPolicy="SslAllow" />
</security>
</ftpServer>Note: The authentication settings for FTP sites are configured at the site-level, unlike authentication for Web sites, which can be configured per URL.
Your <sites> section should now contain something similar to the following example:
<sites>
<site name="Default Web Site" id="1">
<application path="/">
<virtualDirectory path="/" physicalPath="%SystemDrive%\inetpub\wwwroot" />
</application>
<bindings>
<binding protocol="http" bindingInformation="*:80:" />
</bindings>
</site>
<site name="Default FTP Site" id="2">
<application path="/">
<virtualDirectory path="/" physicalPath="%SystemDrive%\inetpub\ftproot" />
</application>
<bindings>
<binding protocol="ftp" bindingInformation="*:21:" />
</bindings>
<ftpServer>
<security>
<authentication>
<anonymousAuthentication enabled="true" userName="IUSR" />
<basicAuthentication enabled="true" />
</authentication>
<ssl controlChannelPolicy="SslAllow" dataChannelPolicy="SslAllow" />
</security>
</ftpServer>
</site> - Scroll to the bottom of your ApplicationHost.config file and add a
location section for your Default FTP Site that will contain your
authorization settings.
<location path="Your FTP Site Name">
<system.ftpServer>
<security>
<authorization>
<add accessType="Allow" users="*" permissions="Read" />
<add accessType="Allow" users="administrator" permissions="Read, Write" />
</authorization>
</security>
</system.ftpServer>
</location>Note: In this example, the authorization settings for FTP sites are configured per URL, and these settings specifically enable Read permissions for all users, and Read/Write permissions for the administrator account. - Save your ApplicationHost.config file.
Summary
In this task you created an FTP site by editing the IIS configuration files. To recap the items that you completed in this step:- You created a new FTP site by using the Default Web Site's settings as a template.
- You configured the following authorization rules for the FTP site:
- All users have Read permissions.
- The administrator account had Read/Write permissions.